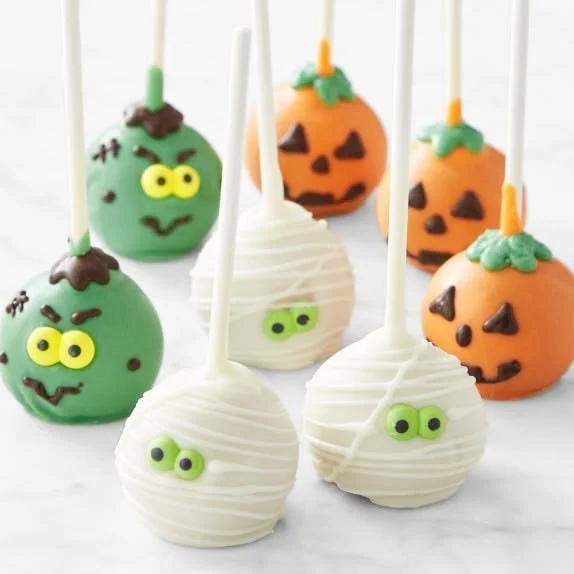
Halloween Cake Pops are a delightful and festive treat that will bring joy to your spooky celebrations. These sweet, bite-sized goodies are not only delicious but also fun to make, making them perfect for family gatherings, classroom parties, or Halloween festivities. With a simple ingredient list and easy preparation, you’ll find that these cake pops are worth the effort.
Why You’ll Love Halloween Cake Pops
- Fun and Festive: Halloween Cake Pops bring an element of fun to your celebrations. Their playful decorations can be tailored to fit any Halloween theme.
- Easy to Make: Even beginner bakers can create these treats with simple steps and common ingredients, making them a fantastic project for families or those new to baking.
- Customizable: You can personalize these cake pops with different colors, flavors, and decorations, allowing for creativity that makes each batch unique.
- Perfect for Sharing: These treats are ideal for gatherings. Their small size makes them easy to share, and they make a lovely addition to any dessert table.
- Tasty and Satisfying: Combining cake and frosting, these pops satisfy your sweet tooth while providing a soft and flavorful bite.
Recipe Overview
- Prep Time: 30 minutes
- Cook Time: 30 minutes
- Total Time: 1 hour
- Servings: Approximately 24 cake pops
- Difficulty Level: Easy
Ingredients You’ll Need for Halloween Cake Pops
- Cake:
- 1 box chocolate cake mix
- 1 box vanilla cake mix
- Frosting:
- 1 cup butter, softened
- 4 cups powdered sugar
- 1/4 cup milk
- 1 teaspoon vanilla extract
- Coating:
- Chocolate melts or candy coating
- Decorations:
- Edible eyes
- Sprinkles or other Halloween-themed decorations
How to Make Halloween Cake Pops
- Bake the Cakes: Prepare the chocolate and vanilla cakes according to the package instructions. Allow them to cool completely after baking.
- Crumb the Cakes: Once cooled, crumble both cakes into a large bowl, mixing them together to combine the flavors.
- Make Buttercream Frosting: In a separate bowl, mix together softened butter, powdered sugar, milk, and vanilla extract until smooth and creamy to create the buttercream frosting.
- Combine Cake and Frosting: Add the buttercream frosting to the crumbled cake mixture. Mix well until the cake and frosting are fully incorporated.
- Form Cake Balls: Using your hands, shape small balls from the cake mixture and place them on a baking sheet lined with parchment paper.
- Freeze the Cake Balls: Freeze the cake balls for about 30 minutes or until they have firmed up.
- Melt Chocolate: While the pops are firming, melt the chocolate melts or candy coating according to package instructions.
- Insert Lollipop Sticks: Dip the end of a lollipop stick into the melted chocolate. Insert it into the center of each cake ball, ensuring it holds well.
- Coat the Cake Pops: Dip each cake pop into the melted chocolate until completely coated. Allow excess coating to drip off.
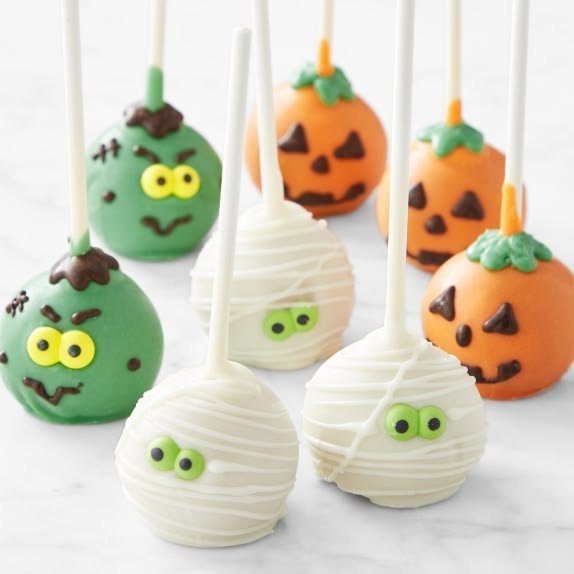
- Decorate and Set: Before the chocolate sets, decorate the cake pops with edible eyes or sprinkles. Let them sit until the coating hardens completely.
Tips for Success
- Make sure the cakes are completely cool before crumbling to avoid a soggy mixture.
- Use a small cookie scoop for even cake balls, ensuring every pop is uniform in size.
- For a cleaner finish, tap the cake pops gently after dipping to allow excess chocolate to fall off.
- Experiment with flavoring the frosting by adding extracts or zest for an extra layer of taste.
Easy Variations
- Different Cake Flavors: Substitute chocolate or vanilla cake mixes with red velvet, lemon, or even spice cake for a seasonal twist.
- Gluten-Free Option: Use gluten-free cake mixes and ensure all other ingredients are gluten-free compliant.
- Vegan Option: Use egg substitute and non-dairy milk and butter replacements for a vegan-friendly version.
- Adding Spices: Mix in a teaspoon of pumpkin spice or cinnamon to the cake mixture for an autumn flavor.
- Chocolate Coating Variations: Use white chocolate or colored candy melts for a unique appearance.
What to Serve with Halloween Cake Pops
- Hot Cocoa: A warm cup of hot cocoa pairs beautifully with cake pops, offering a comforting contrast to the sweet treats.
- Pumpkin Pie: Serve alongside pumpkin pie to embrace the full fall flavor experience.
- Apple Cider: A refreshing glass of apple cider complements the sweetness of the cake pops while enhancing the seasonal theme.
- Charcuterie Board: Add these cake pops to a Halloween-themed charcuterie board for a fun and sweet addition to savory bites.
Storage and Reheating
- Refrigerator Storage: Store leftover cake pops in an airtight container in the refrigerator. They will keep well for up to one week.
- Freezer Storage: For longer storage, wrap each cake pop in plastic wrap, then place them in a freezer-safe bag or container. They can last up to three months in the freezer. Allow them to thaw in the refrigerator for a few hours before serving.
- Best Reheating Method: Since these are best enjoyed fresh, they do not require reheating. Simply let them sit at room temperature after refrigeration for optimal texture.
Common Mistakes to Avoid
- Overmixing the Batter: When combining the cake and frosting, mix just until incorporated to avoid dense cake pops.
- Not Allowing Cake Balls to Freeze: Skipping the freeze time can lead to soft cake balls that won’t hold their shape when dipped.
- Using Warm Chocolate Coating: Ensure the melted chocolate is slightly cooled before dipping the cake pops to prevent the cake from melting.
- Skipping the Stick Dip: Not dipping the lollipop stick in chocolate before insertion can lead to the stick not adhering properly.
Halloween Cake Pops: Background & Cultural Inspiration
Halloween Cake Pops take inspiration from the traditional cake pop concept while infusing a festive Halloween twist. The origins of cake pops date back to the 1980s, becoming popular in recent years due to their playful presentation and versatility. Halloween is a time for creativity and fun, and these treats resonate with the spirit of the holiday. They can evoke feelings of nostalgia for shared baking moments, while also being a favored treat at children’s parties, fall festivals, and Halloween gatherings across cultures.
Frequently Asked Questions
Can I use store-bought frosting for cake pops?
Yes, you can use store-bought frosting to make the process easier. Just make sure it’s a thick consistency.
How far in advance can I make cake pops?
You can make cake pops up to a week in advance; just store them in the refrigerator until ready to serve.
Can I vary the colors of the chocolate coating?
Absolutely! You can use colored candy melts to match different themes or add festive colors for specific occasions.
What’s the best way to transport cake pops?
Transport them in a sturdy box, with individual slots or a foam base to keep them from rolling around.
Can I make cake pops without lollipop sticks?
Yes, you can serve them as cake balls on their own, or use them as a topping for ice cream or desserts.
Final Thoughts
Halloween Cake Pops are a delightful treat that combine creativity with deliciousness. Whether you’re making them for a party or enjoying them with family at home, these easy-to-make cake pops are sure to be a hit. Embrace the fun of Halloween with this engaging baking project—you’ll be glad you did!
PrintHalloween Cake Pops
Delightful and festive Halloween Cake Pops that are fun to make and perfect for your spooky celebrations.
- Prep Time: 30 minutes
- Cook Time: 30 minutes
- Total Time: 60 minutes
- Yield: 24 cake pops
- Category: Dessert
- Method: Baking
- Cuisine: American
- Diet: Vegetarian
Ingredients
- 1 box chocolate cake mix
- 1 box vanilla cake mix
- 1 cup butter, softened
- 4 cups powdered sugar
- 1/4 cup milk
- 1 teaspoon vanilla extract
- Chocolate melts or candy coating
- Edible eyes
- Sprinkles or other Halloween-themed decorations
Instructions
- Bake the cakes: Prepare the chocolate and vanilla cakes according to the package instructions. Allow them to cool completely after baking.
- Crumble the cakes: Once cooled, crumble both cakes into a large bowl, mixing them together to combine the flavors.
- Make buttercream frosting: In a separate bowl, mix together softened butter, powdered sugar, milk, and vanilla extract until smooth and creamy.
- Combine cake and frosting: Add the buttercream frosting to the crumbled cake mixture. Mix well until the cake and frosting are fully incorporated.
- Form cake balls: Using your hands, shape small balls from the cake mixture and place them on a baking sheet lined with parchment paper.
- Freeze the cake balls: Freeze the cake balls for about 30 minutes or until they have firmed up.
- Melt chocolate: While the pops are firming, melt the chocolate melts or candy coating according to package instructions.
- Insert lollipop sticks: Dip the end of a lollipop stick into the melted chocolate and insert it into the center of each cake ball.
- Coat the cake pops: Dip each cake pop into the melted chocolate until completely coated. Allow excess coating to drip off.
- Decorate and set: Before the chocolate sets, decorate the cake pops with edible eyes or sprinkles. Let them sit until the coating hardens completely.
Notes
Make sure the cakes are completely cool before crumbling to avoid a soggy mixture.












