
Halloween Cookies with Spider Web Icing are the perfect treat to celebrate the spooky season. These delightful cookies are not only easy to make but are also a fun way to get creative with your decorations. Whether you’re hosting a Halloween party or simply want to treat your family, these cookies are sure to be a hit.
Why You’ll Love Halloween Cookies with Spider Web Icing
- Fun for All Ages: Making and decorating these cookies is an enjoyable activity for both kids and adults. It’s a great way to bond while unleashing creativity.
- Customizable Designs: You can create unique spider web patterns and use various colors, making each cookie distinct. Feel free to get creative with edible glitter for added flair!
- Deliciously Simple: The cookie base is made from easy-to-find ingredients, making this recipe accessible even for beginner bakers.
- Perfect for Parties: These cookies make a charming addition to any Halloween spread, bringing festivity to snacks and desserts alike.
- Great for Gifting: Package these cookies in festive bags as delightful homemade treats for friends and family during the Halloween season.
Recipe Overview
- Prep Time: 20 minutes
- Cook Time: 10 minutes
- Total Time: 30 minutes
- Servings: About 24 cookies
- Difficulty Level: Easy
Ingredients You’ll Need for Halloween Cookies with Spider Web Icing
-
Cookie Base:
- 2 cups all-purpose flour
- 1 cup unsalted butter, softened
- 1 cup granulated sugar
- 1 egg
- 1 teaspoon vanilla extract
- 1 teaspoon baking powder
- 1/2 teaspoon salt
-
Spider Web Icing:
- Icing sugar (for making the icing)
- Water (to reach desired consistency)
- Food coloring (black and orange for decoration)
- Edible glitter (optional, for a spooky sparkle)
How to Make Halloween Cookies with Spider Web Icing
-
Preheat the Oven: Start by preheating your oven to 350°F (175°C) so it’s ready when your cookies are shaped.
-
Cream Butter and Sugar: In a large bowl, cream together the softened butter and granulated sugar until the mixture is light and fluffy. This process is crucial for the texture of your cookies.
-
Add Egg and Vanilla: Beat in the egg and vanilla extract until everything is well combined. This adds moisture and flavor.
-
Combine Dry Ingredients: In another bowl, whisk together the all-purpose flour, baking powder, and salt. Gradually add these dry ingredients to the butter mixture, mixing until fully combined. Be careful not to over-mix.
-
Shape the Dough: Roll out the dough on a floured surface to about 1/4 inch thickness. Use cookie cutters to cut out fun shapes.
-
Prepare for Baking: Place the cut-out cookies onto a baking sheet lined with parchment paper. Ensure they are spaced apart to allow for spreading.
-
Bake: Bake the cookies in the preheated oven for 8-10 minutes, or until the edges are lightly golden. Keep an eye on them, as baking times can vary depending on your oven.
-
Cool the Cookies: Allow the cookies to cool completely on a wire rack. This step is vital to avoid melting the icing when you decorate.
-
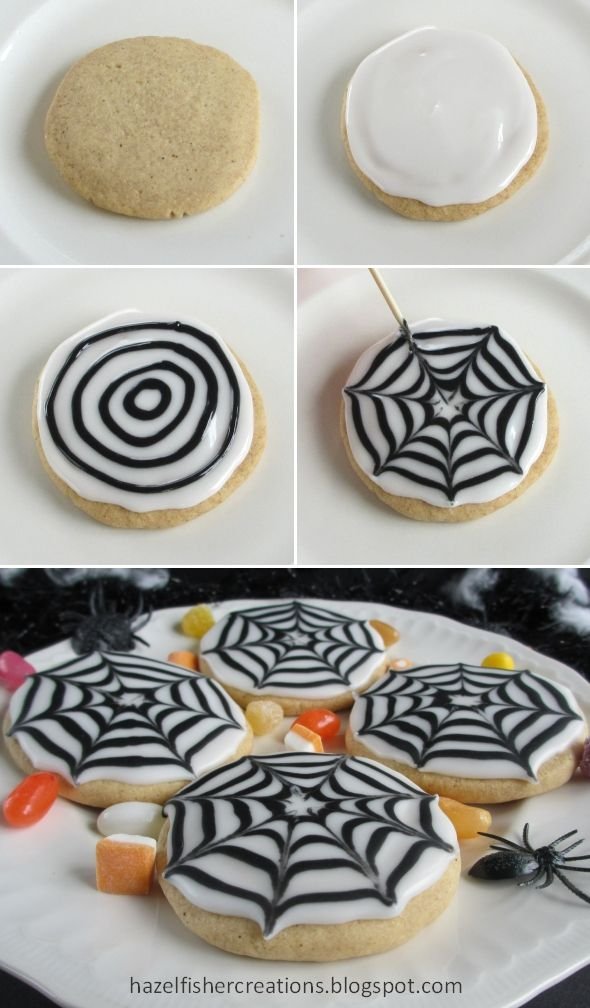
Make the Icing: In a bowl, mix icing sugar with a little water until you reach a piping consistency. Divide the icing into separate bowls and color them as desired using food coloring.
-
Decorate: Use the black icing to create spider web patterns on the cooled cookies. If you’re using edible glitter, sprinkle it over the icing before it sets.
Tips for Success
- Room Temperature Ingredients: Make sure your butter is at room temperature for easier creaming with sugar.
- Don’t Overroll: Roll out the dough gently to avoid tough cookies. Keep it about 1/4 inch thick.
- Test the Icing: Before decorating, test the icing consistency. It should hold a shape but be easy to pipe.
- Chill the Cookies: If the dough feels too soft to cut shapes, chill it in the fridge for about 30 minutes before rolling it out.
Easy Variations
- Decorative Themes: Instead of spider webs, try pumpkin shapes and decorate with orange icing and green accents for leaves.
- Flavor Tweaks: Add spices like cinnamon or nutmeg to the dough for a festive twist.
- Chocolate Cookies: Substitute a portion of the flour with cocoa powder for chocolate-flavored cookies.
- Gluten-Free Option: Use a 1:1 gluten-free flour blend in place of all-purpose flour.
What to Serve with Halloween Cookies – Recipe and Spider Web Icing Tutorial
- Hot Apple Cider: The warm, spiced flavors of hot apple cider complement the sweetness of the cookies.
- Pumpkin Spice Latte: For a seasonal favorite, serve these cookies alongside a cozy pumpkin spice latte.
- Milk or Dairy Alternatives: A classic pairing that balances the sweetness of the cookies.
- Halloween-Themed Treat Board: Include the cookies on a board with other spooky snacks like caramel popcorn and chocolate candies.
Storage and Reheating
- Refrigerator Storage: Store the cookies in an airtight container in the fridge, where they will stay fresh for about a week.
- Freezer Storage: If you want to keep them longer, freeze the cookies in a single layer, between parchment paper, for up to three months.
- Reheating: For soft, warm cookies, microwave them for about 10-15 seconds. Avoid overheating, as it can make them tough.
Common Mistakes to Avoid
- Overbaking: Keep a close eye on the cookies. They should be lightly golden, not dark brown.
- Under-Mixing: Ensure your batter is well-mixed for even texture. Incomplete mixing can lead to uneven cookies.
- Skipping Cooling: Allow cookies to cool fully before icing to prevent the icing from melting.
- Wrong Icing Consistency: Don’t rush your icing; it should be fluid enough to pipe but hold its shape for decoration.
Halloween Cookies with Spider Web Icing: Background & Cultural Inspiration
Halloween cookies have become a cherished tradition, especially in the United States, where families enjoy baking and decorating treats as part of the holiday festivities. The practice of cookie decorating can be traced back to various cultures celebrating harvest festivals. Over the years, the art of sugar cookies has evolved, and today’s creations often reflect the playful and whimsical nature of Halloween. The incorporation of themed decorations, such as spider webs, gives these cookies a distinct and festive flair, inviting creativity into the kitchen.
Frequently Asked Questions
Can I make the dough ahead of time?
Yes! You can prepare the dough ahead of time and store it in the refrigerator for up to 3 days or freeze it for longer storage. Just make sure to let it come to room temperature before rolling.
What can I use instead of butter?
You can substitute unsalted butter with coconut oil or margarine, but this may slightly alter the flavor and texture of the cookies.
How can I store the icing?
Keep leftover icing in an airtight container in the fridge. When ready to use, simply rewhip it to restore its piping consistency.
Can I omit the egg?
You can replace the egg with flaxseed meal mixed with water or a commercial egg replacer for a vegan option.
What if my cookies spread too much?
If your cookies spread during baking, it might be due to too much butter or not enough flour. Ensure accurate measurements and avoid over-creaming the butter.
Final Thoughts
Making Halloween Cookies with Spider Web Icing is an enjoyable way to celebrate the spooky season with delicious treats. This recipe is not only beginner-friendly but allows for fun and creativity in the kitchen. Whether you’re sharing them at a gathering or enjoying them at home, these cookies are sure to bring smiles. Give this delightful recipe a try, and make your Halloween festivities even sweeter!












