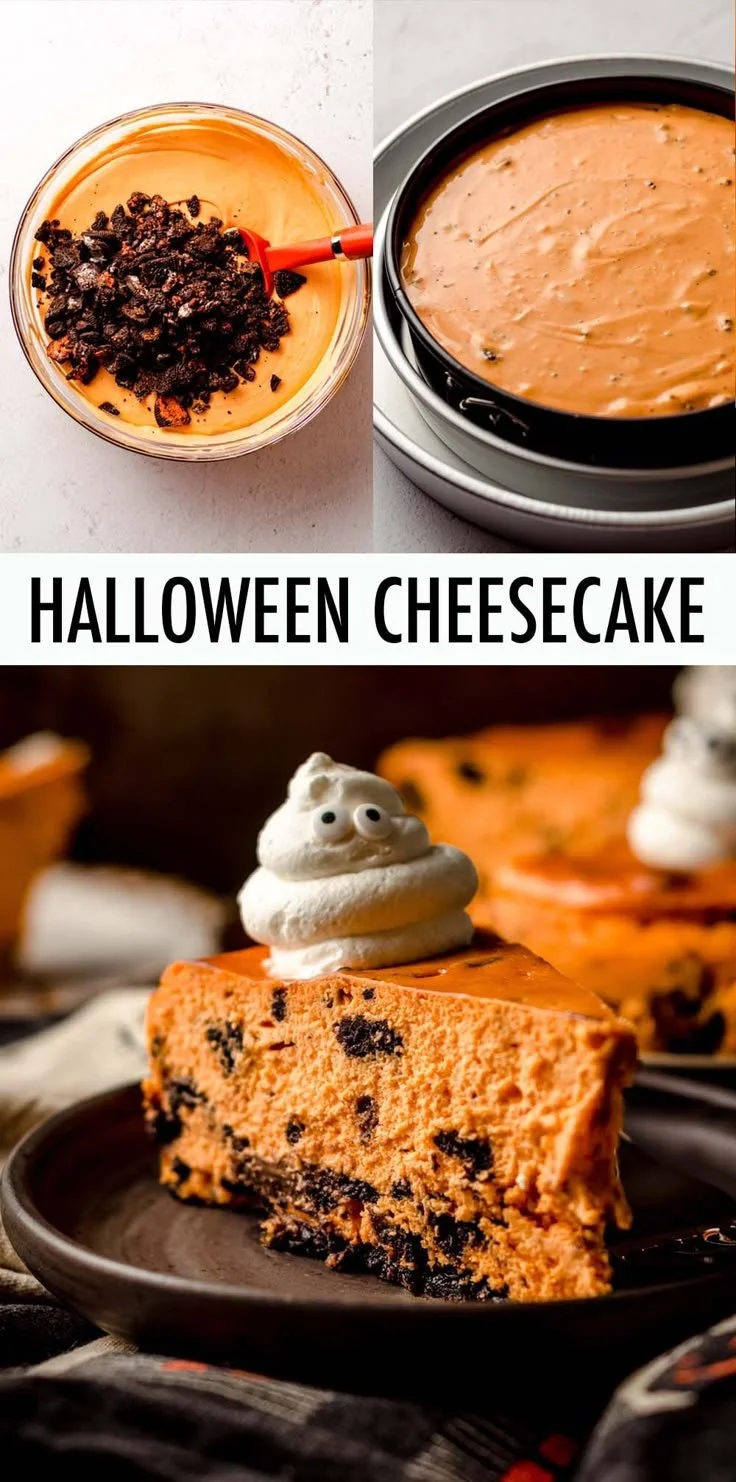
Halloween Cookies and Cream Cheesecake is a delightful and spooky dessert that’s perfect for fall gatherings. With its creamy texture, rich Oreo crust, and playful ghostly whipped cream topping, this cheesecake brings a festive touch to any Halloween celebration. It’s a showstopper that’s surprisingly easy to make, making it a must-try for home bakers wanting to impress their friends and family.
Why You’ll Love Halloween Cookies and Cream Cheesecake
- Family-Friendly Fun: This dessert not only tastes great but also adds a fun element to your Halloween festivities that kids and adults alike will enjoy.
- Deliciously Decadent: The combination of rich cream cheese, Oreo cookies, and smooth whipped cream creates a dessert that’s both indulgent and satisfying without being overly heavy.
- Customizable Appearance: With its ghostly whipped cream topping and candy eyes, you can easily modify the decoration to suit your style or theme for Halloween.
- Easy to Prepare: Simple steps and straightforward ingredients make this cheesecake a manageable option even for beginner bakers.
- Makes a Memorable Centerpiece: This cheesecake is not only delicious but also visually striking, ensuring it will be the star of your dessert table.
Recipe Overview
- Prep Time: 25 minutes
- Cook Time: 55 minutes
- Total Time: 1 hour 20 minutes
- Servings: 12
- Difficulty Level: Easy
Ingredients You’ll Need for Halloween Cookies and Cream Cheesecake
-
For the Crust:
- 20 Oreos
- ¼ cup (57g) unsalted butter, melted
-
For the Cheesecake Filling:
- 32 ounces (900g) full-fat block cream cheese, softened to room temperature
- 1 cup (200g) granulated sugar
- ¼ cup (60mL) heavy whipping cream, at room temperature
- 5 ounces (153g) Greek yogurt or sour cream (about ⅔ cup), at room temperature
- 1 tablespoon vanilla extract
- Orange food coloring (optional)
- 4 large eggs, at room temperature
- 2 large egg yolks, at room temperature
- 14 Oreos, chopped
-
For the Whipped Cream Topping:
- 1 cup homemade whipped cream
- Candy eyes (for decoration)

How to Make Halloween Cookies and Cream Cheesecake
1. Prepare the Oreo Crust
- Crush the Oreos: In a food processor, pulse the 20 Oreos until finely crushed. Alternatively, you can place them in a ziplock bag and crush them with a rolling pin.
- Combine with Butter: In a bowl, mix the crushed Oreos with melted butter until well combined. The mixture should hold together when pressed.
- Form the Crust: Press the mixture into the bottom of a 9-inch springform pan evenly, ensuring it’s compact. Chill in the fridge while you prepare the filling.
2. Make the Cheesecake Filling
- Beat the Cream Cheese: In a large mixing bowl, beat the softened cream cheese until smooth and creamy, using an electric mixer.
- Add Sugar and Wet Ingredients: Gradually add the sugar, heavy cream, Greek yogurt (or sour cream), and vanilla extract. Mix until fully combined and smooth.
- Incorporate Eggs: Add the eggs and egg yolks one at a time, mixing after each addition until just combined. Be cautious not to overmix, as this can create cracks in the cheesecake.
- Color the Mixture: If desired, add a few drops of orange food coloring to give the filling a festive hue, and mix until evenly distributed.
- Fold in Chopped Oreos: Finally, gently fold in the chopped 14 Oreos to retain some chunks for texture.
3. Bake the Cheesecake
- Preheat the Oven: Preheat your oven to 325°F (160°C).
- Prepare for Baking: Pour the cheesecake filling into the chilled crust. Smooth the top with a spatula.
- Bake: Place the pan in the oven and bake for 55 minutes or until the edges are set and the center is still slightly jiggly. Avoid overbaking as this can cause cracks.
- Cool Gradually: Turn off the oven and crack the door open. Let the cheesecake cool in the oven for 1 hour before transferring it to a wire rack to cool to room temperature.
4. Chill and Decorate
- Refrigerate: Once cooled, cover the cheesecake with plastic wrap and refrigerate for at least 4 hours or overnight.
- Whip the Cream: When you’re ready to serve, whip the heavy cream until soft peaks form and then pipe or spread it over the top of the cheesecake.
- Add Candy Eyes: Place candy eyes on the whipped cream to create spooky ghost faces.
Tips for Success
- Soften Cream Cheese Well: Ensure that the cream cheese is completely softened to room temperature; this will help achieve a smooth filling without lumps.
- Avoid Overmixing: When adding eggs, mix until just combined to prevent air bubbles that can lead to cracks.
- Use a Water Bath: For an even creamier texture and to prevent cracks, consider placing your springform pan in a larger pan filled with hot water while baking.
- Chill Thoroughly: Allow the cheesecake to chill completely before decorating to help the whipped cream hold its shape better.
- Cut with Warm Knife: For clean slices, dip your knife in hot water, wipe it dry between cuts, and slice slowly.
Easy Variations
- Chocolate Ganache Drizzle: After chilling, drizzle a chocolate ganache over the whipped cream for a more decadent touch.
- Add Pumpkin Flavor: Mix in some pumpkin puree and pumpkin spices for a seasonal twist.
- Dairy-Free Option: Use dairy-free cream cheese and coconut whipped cream for a lighter alternative.
- Mini Cheesecakes: Create mini versions in cupcake liners for individual servings that are easy to grab.
- Fruit Topping: Top with seasonal fruits like pomegranate seeds or candied oranges for added flavor and visual appeal.
What to Serve with Halloween Cookies and Cream Cheesecake
- Hot Chocolate: The rich creaminess of hot chocolate complements the cheesecake beautifully.
- Spiced Apple Cider: This warm drink enhances the fall flavors of the dessert.
- Halloween-themed Cookies: Pairing with fun cookies can create a themed dessert table.
- Coffee or Espresso: A nice strong coffee balances the sweetness of the cheesecake.
Storage and Reheating
- Refrigerator Storage: Keep the cheesecake covered in the refrigerator for up to 5 days.
- Freezer Storage: You can freeze slices individually, wrapped tightly in plastic wrap, for up to 2 months.
- Reheating: Thaw overnight in the refrigerator for best texture and flavor.
- Preserving Texture: To maintain the whipped cream’s integrity, add the topping right before serving if storing leftovers.
Common Mistakes to Avoid
- Not Soften the Cream Cheese: Starting with cold cream cheese can lead to a lumpy filling.
- Skipping the Cooling Step: Always let the cheesecake cool gradually to prevent cracking.
- Overbaking: Keep an eye on the cheesecake; it should be set around the edges but still have a slight jiggle in the center.
Halloween Cookies and Cream Cheesecake: Background & Cultural Inspiration
The tradition of desserts during Halloween is deep-rooted in various cultures, often featuring rich and sweet flavors to celebrate the harvest season. Cheesecakes have long been a beloved dessert, originating from ancient Greece. Over time, they’ve evolved into various forms worldwide, with the Oreo version adding a modern twist that appeals to both young and adult audiences. This cheesecake combines the fun of Halloween with comforting flavors, creating an inviting dessert that can become a seasonal classic.
Frequently Asked Questions
Can I make this cheesecake in advance?
Absolutely! You can prepare the cheesecake a day or two ahead. Just be sure to add the whipped cream topping closer to serving time.
Can I use low-fat cream cheese?
You can, but the texture might be slightly different. Full-fat cream cheese offers a richer, creamier flavor and texture.
What can I substitute for Greek yogurt?
If you don’t have Greek yogurt on hand, sour cream works just as well, providing a similar tang.
How do I ensure my cheesecake doesn’t crack?
Avoid overmixing and cooling the cheesecake gradually in the oven. Additionally, a water bath can help regulate temperature.
Is it safe to leave my cheesecake out?
It’s best to keep cheesecake refrigerated when not serving. It can sit out for up to 2 hours at room temperature but should be returned to the fridge after serving.
Final Thoughts
Halloween Cookies and Cream Cheesecake is not just a treat; it’s a celebration of flavors and festivity. With its creamy texture and spooky appeal, it’s an excellent addition to any Halloween gathering. Whether you’re a beginner or a seasoned baker, this recipe is approachable and fun, ensuring delicious results that will impress your guests. Give it a try and make your celebrations a little sweeter this Halloween!












