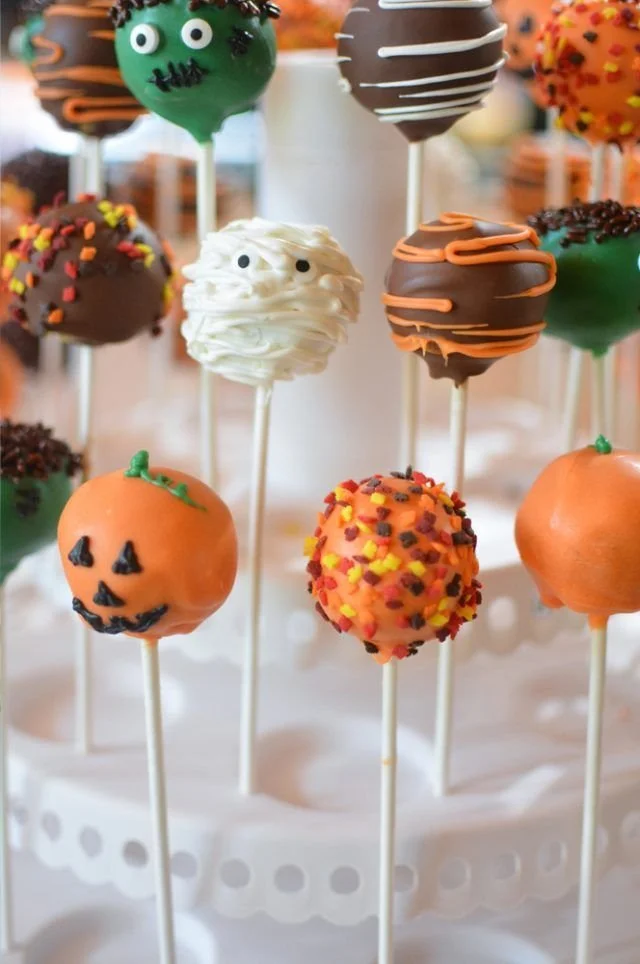
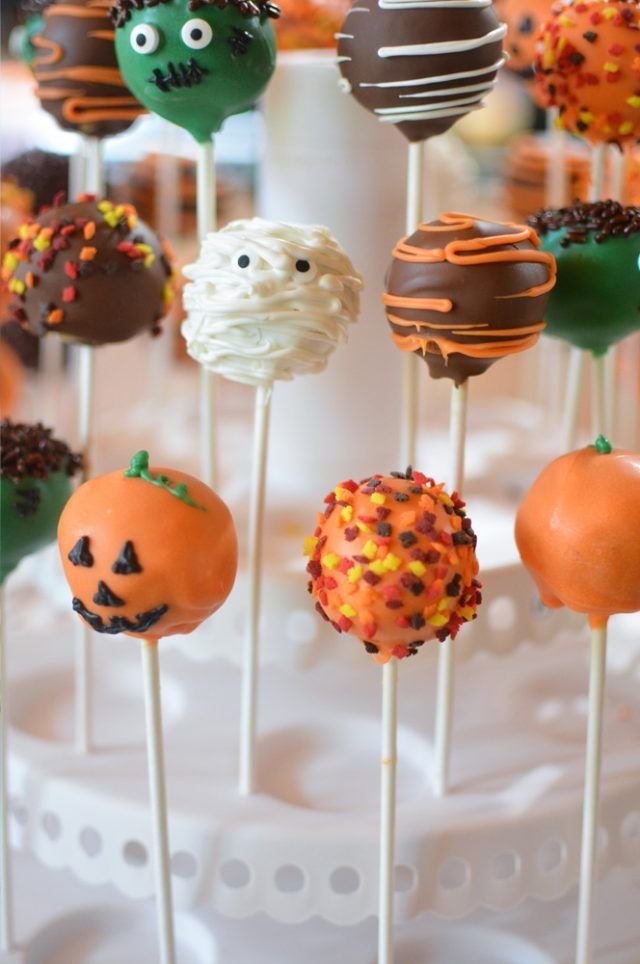
Indulging in Halloween Cake Pops is a delightful way to celebrate the season. These sweet treats are not only fun to make but also perfect for gatherings or parties. Their playful design and rich flavors make them a hit with kids and adults alike, ensuring they disappear in no time.
Why You’ll Love Halloween Cake Pops
- Fun to Make: Crafting these cake pops is an enjoyable experience. It’s a great project to do with kids, allowing everyone to get creative.
- Customizable Decorations: Use a variety of toppings, colors, and sprinkles to create your signature look, making every batch unique.
- Perfect for Parties: Their bite-sized shape makes them ideal for any Halloween celebration, allowing guests to indulge without needing a plate.
- Easy to Prepare: With simple ingredients and straightforward steps, even beginner bakers can successfully whip up these treats.
- Deliciously Decadent: Combining cake and frosting, these cake pops deliver a rich flavor that satisfies your sweet tooth perfectly.
Recipe Overview
- Prep Time: 20 minutes
- Cook Time: 30-40 minutes
- Total Time: 2 hours (including chilling time)
- Servings: About 24-30 pops
- Difficulty Level: Easy
Ingredients You’ll Need for Halloween Cake Pops
-
Cake Mixture:
- 1 box favorite cake mix (any flavor you prefer)
- 1 (3.4 oz) box instant pudding mix (flavor of your choice, such as vanilla or chocolate)
- 4 eggs
- 1 cup water
- 1/3 cup vegetable oil
-
For Decoration:
- 1 cup frosting (any flavor that complements your cake)
- Candy melts (any colors you like for dipping)
- Toppings such as sprinkles or candy eyes
Notes:
- The cake mix and pudding mix will help keep the cake moist.
- Don’t hesitate to mix and match flavors for unique combinations!
- Consider using cream cheese frosting for a rich taste, or chocolate frosting for an indulgent twist.
How to Make Halloween Cake Pops
-
Preheat the Oven: Set your oven to 350°F (175°C). Prepare a 13 x 9-inch pan by spraying it with vegetable pan spray.
-
Mix the Batter: In a large bowl, combine the cake mix, pudding mix, eggs, water, and vegetable oil. Beat at medium speed for about 2 minutes until the mixture is smooth and well combined.
-
Bake the Cake: Pour the batter into the prepared pan. Bake in the preheated oven for 30-40 minutes, or until a toothpick inserted in the center comes out clean. Allow it to cool in the pan for about 10 minutes.
-
Crumble the Cake: Once cooled, use your hands or two forks to crumble the cake into fine pieces. Aim for no large chunks; the finer the crumb, the better the texture for cake pops.
-
Mix with Frosting: Add the frosting to the crumbled cake. Using your fingers, mix until fully combined. The mixture should hold together when squeezed.
-
Form Cake Balls: Roll the mixture into balls about 1 inch in diameter and place them on a baking sheet lined with parchment paper.
-
Chill for Firmness: Place the baking sheet in the refrigerator for at least 2 hours to allow the balls to firm up.
-
Prepare the Candy Coating: Melt the candy melts in the microwave at 50% power, heating in 30-second intervals until smooth. Alternatively, you can melt them on the stovetop in a double boiler.
-
Insert Sticks: Dip the tip of each stick into the melted candy melts before inserting it into the center of each cake ball. This helps secure the stick. Allow the pops to set for a few minutes.
-
Dip the Pops: Once the sticks are secure, dip each cake pop into the melted candy melts, coating evenly. Allow excess candy melts to drip off.
-
Decorate: Before the coating sets, sprinkle your favorite toppings over the pops for that festive Halloween flair.
-
Let Set: Allow the decorated pops to cool and set completely. You can place them in the freezer for about 20 minutes to firm them up quickly.
Tips for Success
- Check Oven Temperature: Ensure your oven is properly calibrated. An overbaked cake can lead to dry cake pops.
- Do Not Overmix: When combining the cake crumbs and frosting, mix just enough to hold the mixture together—this helps maintain a good texture.
- Chill Properly: If the cake pops seem too soft to dip, ensure they are fully chilled in the refrigerator. This makes dipping easier and helps maintain shape.
- Use Quality Candy Melts: Higher-quality candy melts tend to coat better and create a smoother finish.
- Get Creative with Decor: Use themed decorations like orange and black sprinkles or edible glitter to enhance the Halloween spirit.
Easy Variations
- Flavor Swaps: Try different cake and frosting flavors, like red velvet cake with cream cheese frosting for a festive twist.
- Add Nut Butter: For a richer flavor, mix in a few tablespoons of peanut butter or almond butter with the frosting.
- Swap the Dipping Chocolate: Use dark chocolate or white chocolate instead of candy melts for a different taste.
- Dye the Candy Melts: Add a little food coloring to the melts to coordinate with your party theme.
- Stuffed Cake Pops: Add a small piece of your favorite candy or chocolate inside each cake ball before rolling for an unexpected surprise.
What to Serve with Halloween Cake Pops
- Hot Apple Cider: The warm and spicy flavors of cider complement the sweetness of the cake pops perfectly for a festive fall treat.
- Chocolate Milk: This classic pairing adds an extra touch of sweetness, making it a kid-favorite.
- Ice Cream: A scoop of vanilla or pumpkin ice cream alongside these pops creates a fun dessert combo.
- Fruit Platter: Fresh fruit like apples and pears balances the sweetness of the cake pops, offering a refreshing contrast.
- Cheese Board: A selection of cheeses can add a savory note that pairs well with the sweetness of cake pops.
Storage and Reheating
- Refrigerator Storage: Keep cake pops in an airtight container in the refrigerator for up to a week. Ensure they are well-separated to avoid sticking.
- Freezer Storage: For longer storage, freeze uncoated cake balls in a single layer on a baking sheet, then transfer them to an airtight container for up to 3 months. Allow them to thaw in the refrigerator before dipping.
- No Reheating Needed: These cake pops are best enjoyed cold or at room temperature. There’s no need for reheating as it may affect their texture.
Common Mistakes to Avoid
- Overbaking the Cake: Keep a close eye on the baking time to avoid a dry cake. Test with a toothpick for doneness!
- Not Chilling Enough: If you don’t chill the cake balls long enough, they may fall apart during the dipping process.
- Too Warm Candy Coating: Ensure the melted candy melts aren’t too warm when dipping. If they are, it can cause the cake balls to slide off the stick.
- Skipping the Frosting: The frosting is crucial for binding the cake crumbs. Don’t skip or reduce it too much, or your pops may crumble.
- Using Thin Sticks: Make sure your pops have sturdy sticks or lollipop sticks to prevent snapping.
Halloween Cake Pops: Background & Cultural Inspiration
Cake pops originate from the concept of making use of leftover cake scraps, popularized as a clever way to minimize waste. This delightful sweet treat has become a favorite at parties, especially during Halloween when they can be crafted into spooky designs reflecting the holiday spirit. The versatility in decorating allows cake pops to fit any theme, from whimsical to creepy, making them a staple in festive celebrations. With their origins rooted in both creativity and resourcefulness, Halloween cake pops effortlessly blend deliciousness and fun.
Frequently Asked Questions
Can I use any flavor of cake mix?
Absolutely! Feel free to experiment with different cake mixes and pudding flavors to create unique cake pops.
How long do cake pops stay fresh?
Cake pops can stay fresh in the refrigerator for up to a week. If frozen, they can last up to three months.
Can I make cake pops ahead of time?
Yes! You can make and chill the cake balls a day in advance. Just wait to dip them until the day of serving for the best results.
What if my cake pops are falling off the stick?
If your cake pops are falling off, it may be due to them being too warm or not firm enough. Make sure to chill them thoroughly beforehand.
Are there any gluten-free options?
Yes, you can use gluten-free cake mix and pudding to make a gluten-free version of these cake pops.
Final Thoughts
Halloween Cake Pops are not only a fun and festive treat but also an easy way to get into the Halloween spirit. With simple ingredients and clear steps, even novice cooks can create these delightful bites of joy. Whether you’re hosting a Halloween party or looking for a sweet activity with the kids, these cake pops are sure to be loved by all. So gather your ingredients, get creative, and enjoy these charming Halloween snacks!
PrintHalloween Cake Pops

Delightful and festive Halloween Cake Pops that are easy to make and perfect for gatherings, these sweet treats combine cake and frosting for a rich flavor.
- Prep Time: 20 minutes
- Cook Time: 40 minutes
- Total Time: 120 minutes
- Yield: 30 servings
- Category: Dessert
- Method: Baking
- Cuisine: American
- Diet: Vegetarian
Ingredients
- 1 box favorite cake mix (any flavor you prefer)
- 1 (3.4 oz) box instant pudding mix (flavor of your choice)
- 4 eggs
- 1 cup water
- 1/3 cup vegetable oil
- 1 cup frosting (any flavor that complements your cake)
- Candy melts (any colors you like for dipping)
- Toppings such as sprinkles or candy eyes
Instructions
- Preheat the oven: Set your oven to 350°F (175°C). Prepare a 13 x 9-inch pan by spraying it with vegetable pan spray.
- Mix the batter: In a large bowl, combine the cake mix, pudding mix, eggs, water, and vegetable oil. Beat at medium speed for about 2 minutes until the mixture is smooth and well combined.
- Bake the cake: Pour the batter into the prepared pan. Bake in the preheated oven for 30-40 minutes, or until a toothpick inserted in the center comes out clean. Allow it to cool in the pan for about 10 minutes.
- Crumble the cake: Once cooled, use your hands or two forks to crumble the cake into fine pieces. Aim for no large chunks; the finer the crumb, the better the texture for cake pops.
- Mix with frosting: Add the frosting to the crumbled cake. Using your fingers, mix until fully combined. The mixture should hold together when squeezed.
- Form cake balls: Roll the mixture into balls about 1 inch in diameter and place them on a baking sheet lined with parchment paper.
- Chill for firmness: Place the baking sheet in the refrigerator for at least 2 hours to allow the balls to firm up.
- Prepare the candy coating: Melt the candy melts in the microwave at 50% power, heating in 30-second intervals until smooth.
- Insert sticks: Dip the tip of each stick into the melted candy melts before inserting it into the center of each cake ball. This helps secure the stick. Allow the pops to set for a few minutes.
- Dip the pops: Once the sticks are secure, dip each cake pop into the melted candy melts, coating evenly. Allow excess candy melts to drip off.
- Decorate: Before the coating sets, sprinkle your favorite toppings over the pops for that festive Halloween flair.
- Let set: Allow the decorated pops to cool and set completely. You can place them in the freezer for about 20 minutes to firm them up quickly.
Notes
Experiment with flavors and decorations! Consider using cream cheese frosting or chocolate frosting for different tastes.












